Battery switch on travel trailer function is crucial for managing your RV’s power. Understanding how these switches work, where they’re located, and how to maintain them is key to preventing electrical issues and ensuring a safe and enjoyable camping experience. This guide breaks down everything you need to know about your travel trailer’s battery switch, from the different types available to troubleshooting common problems.
We’ll cover safety procedures, maintenance tips, and even delve into how the battery switch interacts with the rest of your RV’s electrical system.
We’ll explore various switch types – single-pole, double-pole, and double-pole double-throw – comparing their pros and cons. We’ll also discuss ideal placement for easy access and safety, highlighting examples of good and bad installations. Finally, we’ll provide a step-by-step guide to safely operating your switch and troubleshooting common problems, empowering you to confidently handle any electrical situation on the road.
Battery Switch Types in Travel Trailers

Choosing the right battery switch for your travel trailer is crucial for managing power and protecting your electrical system. Different types offer varying levels of control and safety features. Understanding these differences will help you select the best option for your needs.
Single-Pole Battery Switches
A single-pole battery switch is the simplest type. It’s essentially an on/off switch for a single battery. This means you can only connect or disconnect one battery at a time from the trailer’s electrical system. It’s inexpensive and easy to install, but lacks the flexibility of more advanced switches. A single-pole switch is suitable for trailers with only one battery and a basic electrical setup.
The primary advantage is its simplicity and low cost; the main disadvantage is its limited functionality.
Double-Pole Battery Switches
A double-pole switch controls two separate circuits simultaneously. This allows you to isolate both the house battery and the chassis battery (often used for starting the vehicle) independently. This provides a higher level of safety, preventing accidental shorts or cross-connections between the two battery banks. While offering better safety than a single-pole switch, it still only allows for on/off control of each battery; you cannot combine the batteries for increased capacity.
Double-Pole Double-Throw (DPDT) Battery Switches
This is the most versatile type of battery switch. A DPDT switch allows you to switch between three different configurations: (1) Both batteries connected in parallel (combined power), (2) Only the house battery connected, (3) Only the chassis battery connected. This gives you maximum flexibility in managing your power sources, allowing you to utilize the combined capacity of both batteries for high-power appliances or to isolate them for charging or maintenance.
This enhanced flexibility comes at a higher cost and slightly increased complexity of installation.
Comparison of Battery Switch Types
| Feature | Single-Pole | Double-Pole | Double-Pole Double-Throw (DPDT) |
|---|---|---|---|
| Number of Batteries Controlled | One | Two (independent control) | Two (parallel or individual control) |
| Control Options | On/Off | On/Off for each battery | Both batteries combined, House battery only, Chassis battery only |
| Safety | Low | Medium | High |
| Cost | Low | Medium | High |
| Complexity | Low | Medium | High |
| Applications | Simple trailers with one battery | Trailers with separate house and chassis batteries | Trailers requiring combined battery power or individual battery isolation |
Operating the Battery Switch
Operating your travel trailer’s battery switch is a straightforward process, but understanding the correct procedure and associated safety precautions is crucial to prevent damage to your equipment and avoid personal injury. Improper handling can lead to serious consequences, so careful attention to detail is essential.Proper operation of your battery switch ensures that you can safely control the flow of power to your trailer’s electrical systems.
This is vital for everything from preventing accidental drain on your battery to ensuring safe maintenance procedures.
Safe Battery Switch Operation Procedure
Before you begin any work on your travel trailer’s electrical system, including operating the battery switch, ensure that you understand the location and function of the switch itself. Typically, it’s a simple on/off switch, but some models might have multiple positions. Consult your owner’s manual for specifics. The process generally involves these steps:
1. Locate the switch
The battery switch is usually located near the battery itself, often in a readily accessible compartment. It might be labeled clearly, or you might need to refer to your owner’s manual for its exact location.
2. Turn the switch to the “OFF” position
So, you’re an audiophile who travels? Awesome! Make sure you check out this guide on audiophile travel setups before your next trip; it’s packed with tips on keeping your ears happy on the go. And don’t forget the practical stuff – get yourself sorted with good travel insurance. A policy from Aon travel insurance might be a good place to start; peace of mind is priceless, especially when you’re carrying expensive audio gear!
This completely disconnects the battery from the trailer’s electrical system. This is your first and most important safety step.
3. Perform your intended task
This could range from disconnecting the battery for storage, performing maintenance on the electrical system, or simply turning off power to conserve battery life.
4. Turn the switch to the “ON” position
When finished with your work, turn the switch back to the “ON” position to restore power to the trailer. Observe your trailer’s lights and appliances to confirm power is restored.
Potential Hazards of Incorrect Operation
Incorrect operation of the battery switch can result in several hazards. A common risk is creating a short circuit. If you accidentally connect wires or terminals improperly while the switch is on, you risk a significant surge of current that could damage components or start a fire. Additionally, direct contact with the battery terminals or exposed wiring while the switch is in the “ON” position can lead to serious electrical shock.
So, you’re an audiophile who loves to travel? Awesome! First things first, make sure you’ve got your listening sorted with a killer setup. Check out this guide on audiophile travel aetup for some seriously great ideas. Then, before you even think about packing your headphones, sort out your travel insurance! Protecting your trip and your gear is key, so look into Aon travel insurance for comprehensive coverage.
That way, you can relax and enjoy the amazing soundscapes wherever your adventures take you!
Essential Safety Precautions
Before you even touch the battery switch, it’s vital to prioritize safety. Here’s a list of essential precautions:
- Always wear appropriate safety gear, including safety glasses and gloves, to protect yourself from potential hazards like battery acid splashes or electrical shocks.
- Ensure the battery switch is completely off before attempting any work on the electrical system. Visually confirm that the switch is in the “OFF” position.
- Never work on the electrical system while the trailer is connected to shore power. This can lead to dangerous voltage imbalances and create a higher risk of shock.
- If you are unsure about any aspect of the process, consult a qualified electrician or refer to your owner’s manual.
- Keep children and pets away from the battery and battery switch area. Batteries contain corrosive chemicals and can be a serious hazard if mishandled.
- If you smell burning or notice any unusual sparking, immediately turn off the battery switch and disconnect the battery from the trailer. Do not attempt to diagnose or repair the problem yourself.
Battery Switch and Electrical System Integration: Battery Switch On Travel Trailer Function
Your travel trailer’s battery switch isn’t a standalone component; it’s a crucial part of a larger electrical system. Understanding how it interacts with other elements like the battery charger, inverter, and shore power is key to maintaining reliable power. This section details the integration and potential issues arising from a malfunctioning switch.The battery switch acts as the central control point for your trailer’s 12-volt DC system, managing the flow of power from your house batteries to various appliances and accessories.
Its proper functioning ensures the safe and efficient distribution of power throughout the system, protecting your equipment and preventing potential damage.
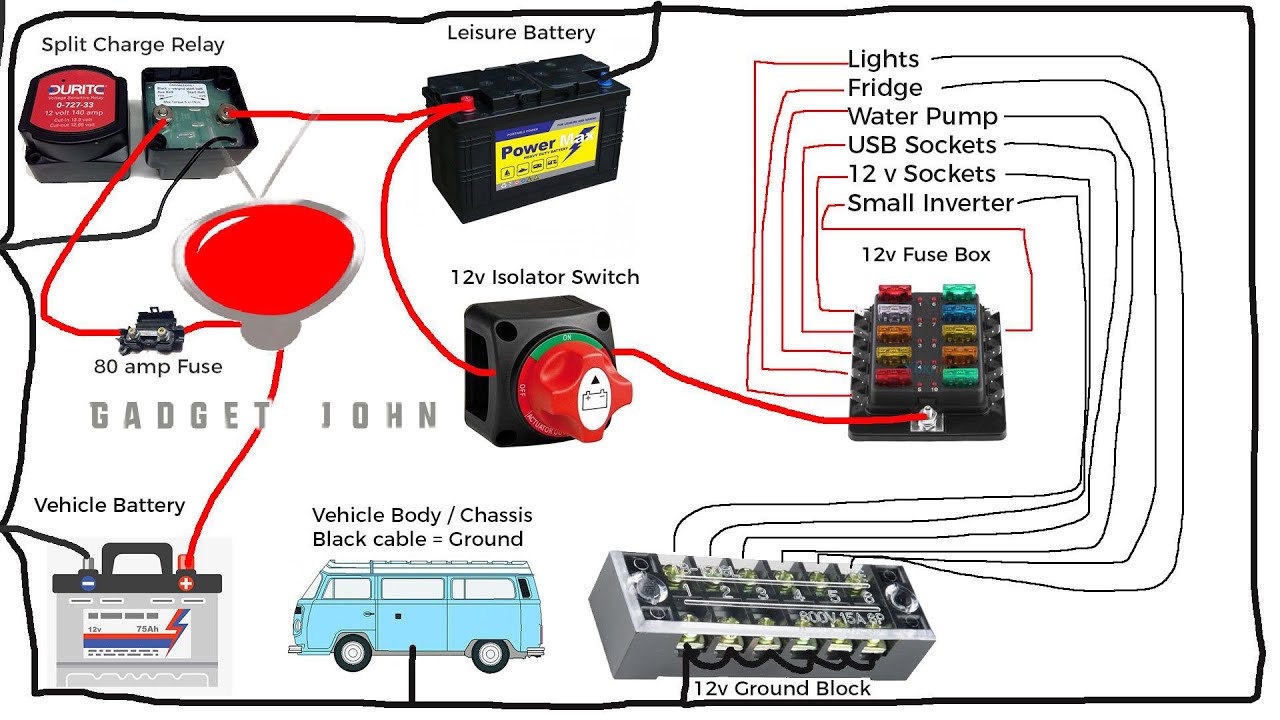
Electrical System Diagram and Component Roles, Battery switch on travel trailer function
Imagine a simple diagram: We’ll start with your trailer’s house batteries (two 12V batteries connected in parallel for 12V, higher amperage). From the positive (+) terminal of the battery bank, a heavy-gauge wire runs to the battery switch. This switch acts like a gate, either allowing power to flow to the rest of the system or completely disconnecting the batteries.
When the switch is ON, power continues to the next component: the battery charger.The battery charger, typically connected to shore power (AC power from a campsite or RV park), converts alternating current (AC) to direct current (DC) to recharge your house batteries. The charger is usually connected to the DC side of the systemafter* the battery switch, meaning the batteries charge only when the switch is in the “on” position.
From the battery charger, another wire runs to the positive terminal of the battery bank, creating a charging loop.Next, another wire leads from the battery switch’s output to the inverter. The inverter converts the 12V DC power from the batteries into 120V AC power, providing power to AC-powered appliances within the trailer when you’re not connected to shore power. Finally, numerous smaller wires branch off from the battery switch to supply 12V DC power directly to things like lights, water pumps, and the refrigerator’s 12V components.This diagram illustrates a basic system.
More complex systems might include solar panels, which would also connect to the battery bank through a charge controller. The charge controller manages the solar power input to prevent overcharging the batteries. However, the battery switch remains the master control, determining whether the batteries are connected to the rest of the system.
Implications of a Faulty Battery Switch
A faulty battery switch can cause a cascade of problems. If the switch is stuck in the “off” position, obviously, none of your 12V DC appliances will work, regardless of whether the batteries are charged or not. If the switch is stuck in the “on” position, and you disconnect from shore power, you’ll rapidly drain your batteries without being able to easily shut them off.
More critically, a poorly functioning switch might create arcing or overheating, potentially leading to a fire hazard. In some cases, a faulty switch could even prevent your battery charger from working correctly, leaving your batteries perpetually undercharged. A faulty switch can also lead to parasitic drain on your batteries, meaning your batteries drain even when nothing is turned on.
This might indicate a short circuit somewhere in the system, which is a serious issue. Therefore, a properly functioning battery switch is vital for the safe and efficient operation of your travel trailer’s electrical system.
Mastering your travel trailer’s battery switch is a small step that significantly enhances your RVing experience. By understanding its function, performing regular maintenance, and knowing how to troubleshoot common issues, you can ensure a reliable power supply and avoid potentially dangerous situations. Remember, safety is paramount; if you’re ever unsure about anything, consult a qualified RV technician. Happy travels!
Popular Questions
What happens if I accidentally leave my battery switch on?
Leaving your battery switch on continuously will drain your battery. This could lead to a dead battery, preventing you from starting your RV or using any 12V appliances.
Can I use a different type of battery switch than what came with my RV?
While you can replace it, ensure the replacement switch has the correct amperage rating for your system. Incorrect amperage could damage your electrical system or even cause a fire. Consult a professional if unsure.
How often should I clean my battery switch?
Inspect your battery switch every few months and clean the terminals with a wire brush to remove corrosion. This ensures a good electrical connection and prevents problems.
My battery switch feels hot to the touch. Is this normal?
A slightly warm switch is sometimes normal, especially under heavy load. However, an excessively hot switch indicates a problem, possibly a loose connection or a faulty switch. Turn it off immediately and investigate the issue.
